Talking Paleo With The Merrymaker Sisters


I have found some fab Paleo resources on Instragram and one of my favourites is The Merrymaker Sisters – two Australian sisters living and loving Paleo and cooking up one hell of a storm. So I thought I would ask the girls about how they find Paleo and what motivated them to start eating that way……

Screen Shot 2013-02-23 at 4.50.43 PM

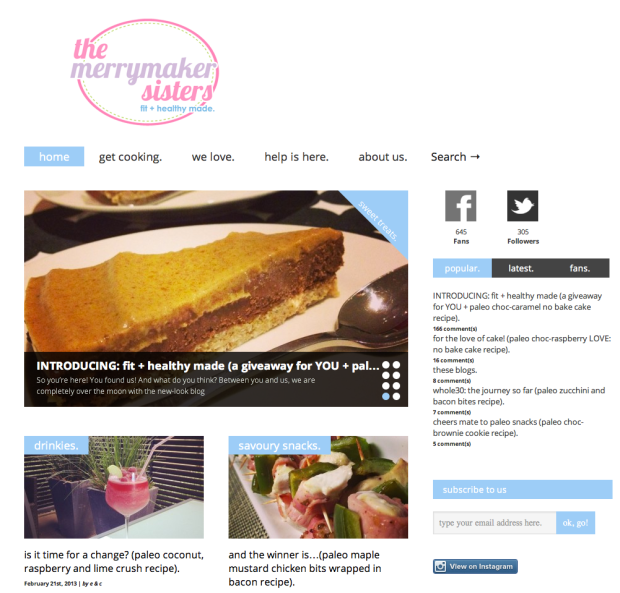
We are  the merrymaker sisters: fit + healthy made. Two sisters, e & c who love to find ways to make life fun, tasty and most importantly…healthy!

Our lifestyle revolves around creating paleo + primal + clean eating recipes, being fit and all-in-all? Feeling the best we can inside and out.

When people hear about how we eat, the usual questions start…what’s paleo? What can you eat? More importantly–what can’t you eat? Don’t you miss bread? What do you eat for breakfast though? 

These are definitely the top five questions we answer on a daily basis—and it’s great! We jump at any chance to talk food and health.

Let’s just quickly get the boring bits over…we aren’t nutritionists! We don’t know what preservative 202 is (well we do now because we just googled it!) but we do know what works for us…and it works well! So we follow a strict: ‘do what works for you and what makes you feel good’ policy. We are all about creating a positive environment to make being fit + healthy that little bit easier and a lot more fun!

So why paleo? Two reasons, the first, (a little more common): c had a wedding to attend…in Fiji…meaning bikini…c wanted to look and feel good. Reason #2: since we can remember, e has had tummy issues, we are talking looking six months pregnant at the end of every day. Welcome: PALEO…and the results? We both lost around 10kg (Fiji bikini body: tick!) and e was no longer feeling bloated and sluggish (DOUBLE TICK!)

Not to mention the other benefits of: increased energy, clearer skin, flatter tummies, stronger muscles and general happiness level? Well that is right up there! With so many benefits we think it’s kind of crazy more people aren’t on to it!

So we are feeling good and looking better…there’s no turning back. Over at fit + healthy made we enjoy reinventing meals we thought were going to be thrown in the ‘no column’ forever and making them paleo + primal + clean. Things like  lasagnepancakes, muffins and  chippies and dip. Yes we said chippies and dip! We also have a new found love for paleo no bake cakes…ooo we love cake! These unfortunately don’t last longer than a day in our household (too darn yum for our own liking!)

Paleo Lasagne

Paleo Sweet Potato Pancakes

Paleo Choc-Raspberry No Bake Cake

Paleo Chips n Dip

Always merrymaking,

e & c

You can also follow the girls on Facebook and on Instagram.

I am sure will enjoys the girls adventures as much as I do!

Cheers,

Linda
Paleo Thermomix Cauliflower Pizza Base

I had been looking at cauliflower pizza base recipes for a while and I have finally made one in the Thermy….so without any further delay

Ingredients:

  •  1/2 a head of cauliflower
  • 1 egg
  • 50 g of good quality mozzarella cheese
  • 1/2 tspn of dried oregano or herb of your choice
  • salt and pepper to taste

Method

Pre-heat oven to 180 deg C

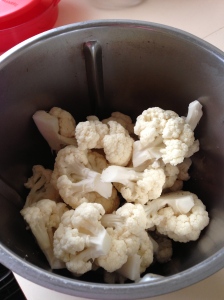
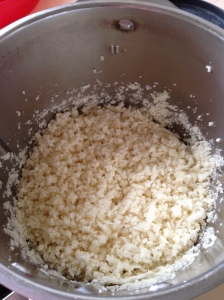
Break the cauliflower head into florets and put into the TM bowl – on closed lid pulse on Tubro 2-3 times till cauliflower resembles crumbs

IMG_4877 IMG_4878

Place the cauli crumbs in a microwave safe bowl with a lid and microwave on HIGH for 6-8 min (depending on the power of your microwave) – there is no need to add water

Allow to cool on the bench for 5 mins or so.

Add the cauli crumbs back to the TM bowl and add remaining ingredients – on closed lid Knead for 10-15 secs to incorporate ingredients – you may have to scrape down sides of bowl mid way through.

IMG_4881

Spread mix out onto a baking tray that is lined with baking paper – I used my Simply Magic liner for this. I made 2 medium pizzas with this batch.

Cook for approx 10 min until golden.

IMG_4886

Then top with your favourite toppings and cook.

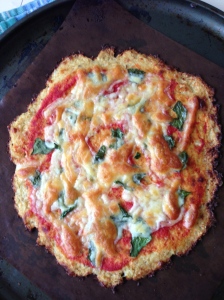
For my first pizza I topped it with passata, home grown basil and mozzarella.

IMG_4887

IMG_4888

The second pizza I topped with caramelised onion and roast lamb topping – which I will post the recipe for shortly 😀

Cheers,

Linda

Paleo Diet Recipe Resources

I have had a number of friends interested in starting the Paleo Diet but the big question I get is “where do you find your recipes?” So I thought I would share some of my favourite websites, apps, and recipe books with you.

Websites

My go to websites to find Paleo inspiration are the following:

IMG_4337IMG_4322IMG_4308


IMG_4314IMG_3245

  • PaleOMG: too many recipes to list!

Apps

  • Nom Nom Paleo – the most fantastic recipe app – super easy step by step instructions….well worth the money! 

Recipe Books 

I have many of my recipe book on my Kindle app on my iPad, mainly cause I didn’t wait to wait for post from America!

Make It Paleo 

Everyday Paleo 

Paleo Comfort Foods Homestyle Cooking for a Gluten-Free Kitchen 

Well Fed

These are just a snippet of soome of the fabulous Paleo resources out there but I think enough for anyone just starting on a Paleo journey.

Cheers,

Linda

Grain Free (Paleo) Banana Pancakes – Thermomix Recipe Conversion

I have been asked by a friend to provide a bit of background on the Paleo (Paleolithic) diet, which I will do in a couple of days. In the meantime here is a Thermomix conversion of one of my favourite breakfasts, Banana Pancakes from the Against All Grain – which I am making as write this!

My kids love these too….I need to try and sneakily make them otherwise they are all gone before I realise it!

The non-Thermomix recipe can be found by clicking here.

Ingredients (makes 8-10 small pancakes)

  • 3 medium eggs, at room temperature
  • 50 grams non dairy milk (I used coconut milk but you could use almond milk)
  • 1 teaspoon vanilla essence
  • 5 grams honey
  • 10 grams of coconut flour ( I use either Bob’s Red Mill Organic Coconut Flour or Health Reflections Certified Organic Coconut Flour)
  • 40 grams of almond flour (I milled my own almonds in the Thermomix)
  • 1/2 teaspoon baking soda
  • 1/4 teaspoon salt
  • 1 really ripe banana (brown spots are the best!)
  • 1/4 cup chocolate chips (if you like)
  • Butter or coconut oil for the pan

Method

  • Place all the wet ingredients and the banana, broken into pieces, into the Thermomix bowl – mix on Speed 5 for 10 secs.

IMG_4250


  • Add the dry ingredients to to the bowl and mix for a further 10 secs on Speed 5.
  • Scrape down the sides of the bowl and let the mixture sit for 5 minutes so the flours can soak up the moisture from the wet ingredients.

Cook as per instructions below from Against All Grain

  • Heat a cast iron (or non-stick) pan over medium-high heat. You can also use a griddle to make more pancakes at once. Mix the batter again, then begin making your pancakes.
  • Oil the pan with coconut oil or butter, then pour about a 1/4 cup of batter per pancake. The pancakes are easier to flip if you keep them small, about 4 inches in diameter.

IMG_4251


  • Once the pancake begins to bubble, place a couple of slices of banana and a pinch of chocolate chips on top.
  • Carefully flip the pancake over, and cook for another minute until the pancake has fluffed up an feels slightly firm.
  • Keep hot in a warm oven until you are done making the remainder of the pancakes.
  • These are best eaten immediately, but if you have leftovers you can warm them in a toaster the next day.

Enjoy,
Linda

Gluten-free, Grain-free, Dairy-free Paleo Bread – Recipe Review

I LOVE bread – but unfortunately it doesn’t love me. My mother had Coeliac disease and I am gluten intolerant. Being on the Paleo diet this means that you are also grain-free so that means that you don’t eat any of pre-made store bought or home made gluten-free breads.

My lovely friend Jess forwarded me this Paleo bread recipe from the Against All Grain website the other day and I thought I would give it a go to see what it was like.

This recipe calls for cashew butter, coconut flour, eggs, almond milk, bi-carbonate of soda, honey, salt and apple cider vinegar. I decided to adapt the recipe so I could make it in my Thermomix which worked really well.

This is a picture of how mine turned out…

What I liked about this bread:

  • it was pretty easy to adapt the recipe to Thermomix and this means that you didn’t need to wash lots of mixing bowls – the recipe calls for beaten egg whites and mixing things separately in different steps.
  • it had a lovely light, almost sponge texture – the egg whites meant that the loaf over all hardly weighed anything
  • the taste was good, a little nutty and a little sweet
  • it toasted well and stayed fresh for about 3 days

What I didn’t like:

There was nothing I really disliked about this recipe. The ingredients were easily obtained from the local health food store, but as expected the cashew butter and the coconut flour were pricey.

Would I make it again?

I would happily make this again, it would not be something that I made regularly as a substitute for “normal” bread but rather as a treat or for a change. I have decided that nothing will ever really replace “normal” bread so I would rather live without it than settle for something to replace it.

All in all, this is a good recipe and from what I have seen from the rest of the site they have some other great recipes that I will be giving a go.

For the full recipe click here and if you would like the Thermomix adaption of this recipe just leave a comment and I will post it.

Cheers,

Linda