Upcycled Fashion from enoch & plonk

I have been so lucky to ‘meet’ some amazing people through my Facebook page Nifty Mums Network  and Nicola from enoch & plonk is one of those people. Not only does she have a wicked sense of humour 😛 but she is super talented when it comes to sewing so I thought I would ask her about how she came to sew and start her business enoch & plonk…..

I’ve always been very crafty.  It wasn’t until I started school that I was to over hear my teacher tell my parents that… “I think Nicola is going to be an artist.”  I realised then that it was something I could be, wanted to be and was going to be.

 I remember one Christmas my family was given a huge book on making things…crafts, cooking, you name it.  Most school holidays were spent struggling with this enormous book (it was truly immense) on the dining room table deciding what I was going to tackle next.  many a Saturday and Sunday if Dad was tinkering around in his garden shed I’d be there hammering two pieces of wood together trying to make a boat.  Once I’d got the hang of a hand drill I fashioned a small block of triangular timber into a block of swiss cheese and carved a small mouse to sit on it.  I think the inspiration had come from seeing an example of Mouseman’s work which had been on The Antiques Roadshow.

So there I was always creating something or other, living in a family of very practical folk.  Mum was a huge sewer, she has spent most of her working life behind a sewing machine and a lot of her spare time making, crafting and creating. 

 Of course I resisted the desire to sew.  There was NO way I was going to use a sewing machine, not a chance.  Apart from this stubborn ‘I don’t want to be like my mum’ mentality they are bloody dangerous things.  I was always terrified of sewing through my thumb, which had happened to my Auntie and she had been a trained machinist.  

 I can remember making a skirt at secondary school in our home economics class.  It was made of corduroy and gathered.  A huge mistake, it ended up like a cardboard balloon.  The corduroy was a huge mistake.  This experience totally put me off sewing clothes.

 My mum had got hold of a very very old singer sewing machine which she gave me to play with.  The ones with a handle which you have to turn…you know the ones.  Amazingly one year I made my little sister a small wallet which I machine embroidered with ‘Penny’ on in very fancy swirly writing.  Mum was amazed, apparently it is a very difficult thing to do with one hand moving the fabric, Penny was less thrilled because it hadn’t cost me anything hahahaha.

 It wasn’t till I had my kids, I was 5 days off my 35th birthday, that I uncovered an over whelming desire to making things for them.  It started with the curtains for their bedrooms.  Nothing fancy but it was technical enough to build my confidence and I began to realise ‘I could actually do this’. 

 Gradually I moved on to clothes.  Just simple appliquéd designs on t.shirts.  Appliqué had just started to re-appear in all the kids clothes shops and loving the idea of creating little pictures with fabric, I thought I’d give it a go.

 I’d already been on Facebook for a little while before I’d started sewing appliqué and sharing some of my work I found that family and friends really loved what I was doing.  So much so that they suggested I create my own designs to sell on-line.

 It wasn’t until I shared some photos of clothes which I’d made my daughter, ones that I’d been brave enough to tackle, I began to realise that I was quite good at that too.  I knew how to design my own patterns after teaching design technology at high school.  A skill which was purely self taught, through reading the right books, and obviously involved a fair amount of drawing.  

 From there things snowballed.  I had made Ella a few items which I’d refashioned from men’s t.shirts.      I wanted her to look cool and funky and I wasn’t very keen on over the top girly clothes.  I’m a great believer in being expressive with clothing.  

551258_405295112860093_972733474_n

554807_382698491786422_968155887_n

543279_371504202905851_1195468968_n

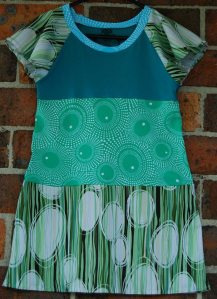
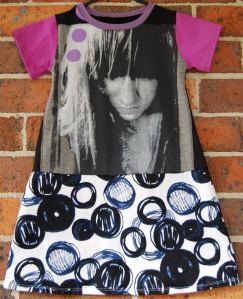
Doing everything officially I set up my own little business ‘enoch & plonk’ creating one-of-a-kind upcycled clothing for girls with attitude.  What started as changing adult tees into small dresses has now developed into tees mixed with new stretch fabrics, second hand finds and OP shop gems.  My work is ever evolving, ever changing.  I find it hugely satisfying.  It fulfils my desire to create, dress my children in clothing that reflects their personalities and brings a smile to the faces of customers and their children.

 Nicola Thomas

artist and designer at enoch & plonk

website          http://www.enochandplonk.com

Facebook      http://www.facebook.com/enochandplonk

etsy                 http://www.etsy.com/shop/enochandplonk

bigcartel         http://enochandplonk.bigcartel.com


You can email Nicola at info@enochandplonk.com


Review of Craftsy Online Class “The Couture Dress”

I had always known of couture  and couture designers but I confess I really didn’t know what it meant. I recently purchased two books off Amazon that got me interested in couture techniques, the first was Gertie’s New Book for Better Sewing by Gretchen Hirsch  and the second was Couture Sewing Techniques by Claire B. Shaeffer . I will be honest I don’t have time to sit and sew bound button holes or hand baste raw fabric edges but the techniques and the reasons behind couture garment design and construction and really brilliant to know.

I love the Craftsy website and had seen The Couture Dress online class with Susan Khalje but initially I didn’t think it was for me. After reading a number of reviews that highly recommended the course, plus there being a excellent sale on courses I decided to give it a go.

Well I wasn’t disappointed. The course is certainly long and involved following the couture dressmaking process from preparing a muslin, fitting and alteration of the muslin, using the muslin as a pattern for your fashion fabric and garment lining. However, the insight  into form and function, the hows and whys a garment to put together in such a way was priceless. Susan’s classes were peppered with great tips from years of experience and I have already started using some of the couture techniques in non-couture projects.

Some of the things included in the course are:

  • constructing a muslin
  • adjusting fit
  • underlining
  • hand-picked zippers
  • perfect hems
  • working with bias material
  • matching plaids and patterns
  • garment and pattern alteration
  • a range of hand sewing techniques
  • setting sleeves and more

The course also includes a copy of the Vogue Easy Options Miss’s Dress posted out to you in your selected size.

To take a look at a video snippet of what the course entails click here.

So if you have the time or the inclination you wont be disappointed !

Linda

How To Create A Super Neat Finish When Attaching Bias Binding

I have been searching for some time for a way to finish off bias binding really neatly. I have always been really disappointed with my efforts when it came to finishing it off as I just cut it a little longer than I needed and tried to somehow fold it neatly and then try and keep it in place to sew it down.

This is one of my previous attempts to finish off bias binding on a neckline, which the OCD sewing freak in me detests…..

Poorly finished off bias binding on a neckline

Uneven bias binding finishing – ends folded over and overlapped…..not happy with it at all 😦

So after numerous google searches and You Tube videos I came across this quilting video and finally I thought I may just have a chance to make this right!!

So on my most recent project, a dress with bias tape around the neckline I decided to adapt this approach to see if I could improve the finish of the bias binding and it worked!!! So here is how I did it.

1. I made the bias tape a good 5-6 inches longer than the length I needed for the neckline and found the centre of the tape and started pinning it around the neckline starting at one of the shoulder seams.

2. When I got to the point on the other side of the neck line where the two ends met I made a mark on each piece  – this is where I will make the seam.

I marked the point at which each end of the bias tape met - this is where I will make the seam

I marked the point at which each end of the bias tape met – this is where I will make the seam

3. Then I unpinned some of the binding from the neck line so I could move it away from the body of the dress to sew my seam. I put right sides together as I would for joining bias tape when making a continuous piece – I made sure the 2 marks I made for the seam overlapped to form a cross and then drew in my 45 degrees sewing line to join the 2 pieces together.

IMG_4009

Pin binding together so that marked points overlap in a cross – then draw in a 45 degree sewing line as you would is joining material to make continuous binding length

4. I then sewed along this line, pressed the seam open and trimmed off excess material.

IMG_4012

Trimmed seam – looking promising!

5. I then repinned the binding to the neckline to see if it fit….and hooray it did – remember bias binding has quite alot of stretch because it is cut on the fabric bias so when pinning try not to stretch the binding too much or you will end up with excess binding by the time you get to the end! This was how my seam looked once I had sewn it into place.

IMG_4011

6. Finally I folded over the remaining half of the binding, pinned in place and topstitched in place and the result was perfect – even better than I hoped! You can barely tell where the join is!

IMG_4014

all finished off – wrong side of garment

IMG_4013

Binding all attached and neatly finished…..super pleased with this!

This is the project in progress 🙂

Lily dress in progress

Lily dress in progress


So for anyone out there who is frustrated and let down by the finish of their bias binding why not give this a try. If you have any queries, I didn’t take as many pictures as I would of liked as I didn’t realise how well this would work till half way through the process, feel free to leave a comment and I will try to answer any questions.

Linda

Step By Step Tutorial: How To Make a Fabric Covered Belt

Two of my recent sewing projects have called for self covered fabric belts, but after searching the local sewing stores and online in Australia I could not find a belt making kit anywhere. Thankfully in the resources section in the back of my copy of Gertie’s New Book For Better Sewing  she listed a place in the USA who sold belt kits. So through the joys of the internet I jumped online to purchase some belt kits and some horsehair braid (for another retro project from Gertie’s book!).

Gertie’s New Book For Better Sewing – available through Amazon

I purchased from a great USA online store A Fashionable Stitch 2 belt kits, one rectangular and one circular buckle. The kits are great and include adhesive material to attach to fabric to buckle, belting, belt prong, eyelets, washers and a great set of instructions with diagrams.

Belt kit from A Fashionable Stitch

I followed the kits instructions for all the belt making except the way in which the fabric is attached to the belt so here’s how I did it.

Step 1. Press your fabric and if it is a flimsy fabric apply interfacing to the wrong side to make it more stable. Peel off one side of the adhesive pattern and stick it to the wrong side of the material. Cut around the outside of the pattern piece.

Step 2. Carefully cut out the marked portion of the adhesive piece being careful not to cut past the corner lines, I used a small rotary cutter and embroidery scissors for this.

Step 3. Peel the adhesive layer away from the pattern piece and carefully centre the pattern piece over the front portion of the buckle.

Step 4. Carefully stick the fabric to the buckle press down firmly to secure. Once done slip the back of the buckle into the front and crimp centre prong and corners of buckle to secure.

Step 5. If using buckle prong with eyelets attach prong to buckle and close with pliers.

Step 6. Cut the belting adding approximately an extra 6 inches to your waist measurement – shape the end to a point or curve as desired.

Step 7. Measure the width of your belting and cut a piece of fabric on the grain approx 3 inches longer than the length of your belting. My belting was 1 1/2 inches wide so from the folded edge I measured 1 1/2 inches plus 5/8 inch seam allowance. I then sewed along the long edge and trimmed the seam allowance.

Step 8. I then pressed the fabric and seam open so the seam was in the middle of the belt. Then at one end I sewed a point the same dimension as those as the belting material and trimmed the seam allowance so it would sit nicely when turned out to the right side.

Step 9. I turned the fabric so it was facing the right way out and inserted the belting material, pressed it and topstitched the edges of the belt. To ensure the belting didn’t  move within the fabric casing I inserted at pin at the other end of the belt where the fabric excess was.

Step 10. Thread excess fabric end through buckle and cut a small wedge of fabric out where prong will pass through (omit this if not using prong and eyelets).

Step 11. Fold over excess and hand stitch closed to secure fabric to belt buckle.

Step 12. Mark holes for eyelets on belt – measure approx 3 1/2 inches from belt tip and mark 4-5 spots for eyelet placement (an inch apart)and then punch holes with either a hole punch (pictured below) or with an eyelet tool.

Step 13. Place eyelets on right side of belt, then turn over belt, place washers over eyelets and punch closed using an eyelet tool and hammer.

Washer in place on wrong side of belt and eyelet tool

Eyelet tool placement before punching closed with hammer

And voilá there you have it!

The finished product!

So this is my fabric covered dress on my project – well worth the effort I think!

I hope this help anyone that is aiming to make a fabric covered belt. This tutorial is a bit of a fusion of the fantastic tutorials by  A Fashionable Stitch – hand covering a buckle and Coletterie – how to fabric cover a belt  which are both fabulous resources so be sure to check them out.

Cheers,
Linda

A Lesson In Self Restraint – A Visit To L’Uccello Vintage Haberdashery Store

Well today was a real test for me….that is in the fabric department!

Earlier in the week I managed to survive a trip to Spotlight, the first since my self imposed twelve month ban on fabric purchases, walking away with only some curtain backing a darning needle and a some fabric stabiliser.

I decided the ultimate challenge would be to go to not only Tessuti Fabrics but L’Uccello Vintage Haberdashery , whose blog I’d been drooling over for nearly 12 months but had yet managed to make it to their shop.

Well, I was not disappointed by L’Uccello Vintage Haberdashery….vintage French spools of cotton twine and silk thread, vintage buttons galore, Parisian inspired home wares, the list goes on…. It was absolutely beautiful and there was also a gorgeous range of Liberty of London and Moda fabric.

Beautiful vintage buttons!

Fortunately for my bank balance I was on my best behaviour and managed to get out the door with only two sets of vintage buttons and some bias tape for projects I am currently working on.

My lovely purchases

The bonus for me also was the store was right above one of my favourite vintage/retro stores Retrostar who have a huge range of mens and womens vintage clothing and accessories.

Just some of the collection at Retrostar!

So if you are in Melbourne city be sure to check out L’Uccello Vinatge Haberdashery – you wont be disappointed. For those who can’t make the trek keep an eye on their blog as they will be opening an online soon in the near future.

L’uccello is in room 5 on
the second floor, enter via
Cathedral Arcade 

near the corner of Swanston St
& Flinders Lane.
ph: 9639 0088

Linda